

So here are the dimension for this project:
A piece of Card Stock cut at 9" X 5 1/2"
A coordinating piece of Card Stock measuring 3 1/8" X 3 1/8"
4 to 7 Pieces of Designer Series Paper or stamped card stock measuring 1 7/8" X 2 1/2"
A piece of DSP or card stock measuring 1 7/8" X 5 1/4"
These are scoring measurements:
With your 9" X 5 1/2" piece of cardstock with the long side at the top of your Simply Scored, score at 2 1/8", 4 1/4", 6 3/8" and 8 1/2"
turn it 90 degrees so the short side is along the top and score at 2 3/4"
With your 3 1/8" X 3 1/8" piece of card stock you want to score it at 1/2" and 2 5/8", then cut it in half so you have two score lines on each piece.
With your larger piece of cardstock you want to cut up on all of the score lines on one side. Completely remove the small rectangle to one side, and notch out a triangle on the opposing small rectangle to help your box fold together nicely. Burnish all of your score lines with your Bone Folder AFTER you cut and trim your cardstock. It will look better when you are finished. Once you have all of your score lines burnished, place a piece of Sticky Strip along the small remaining rectangle on the outside of the box. Then fold it over and meet it with the other side to form the box.
With the two small pieces of cardstock from earlier, you want to burnish the score lines creating a "Z" shape with the cardstock. Place Sticky Strip on opposing sides of the cardstock. Take one flap and gently put it inside the box with the edge of the cardstock against the back of the box. Gently flatten the box and the two sides with adhere inside the box perfectly for you. Do the same with the other piece of cardstock, but towards the front of the box. Line up the edge of your cardstock with the front and fold it over. Now you will have your box completely formed and ready to go.
Now it's time to decorate and embellish your project. Take the longer strip of DSP or stamped cardstock and put it at the back of your box. I always look for the seam and make that the back of my box. This will hold the back upright. Then take your remaining small pieces of DSP or cardstock and put them on the flaps of your box. You can also put them along the bottom as well as you can see in my other two samples.

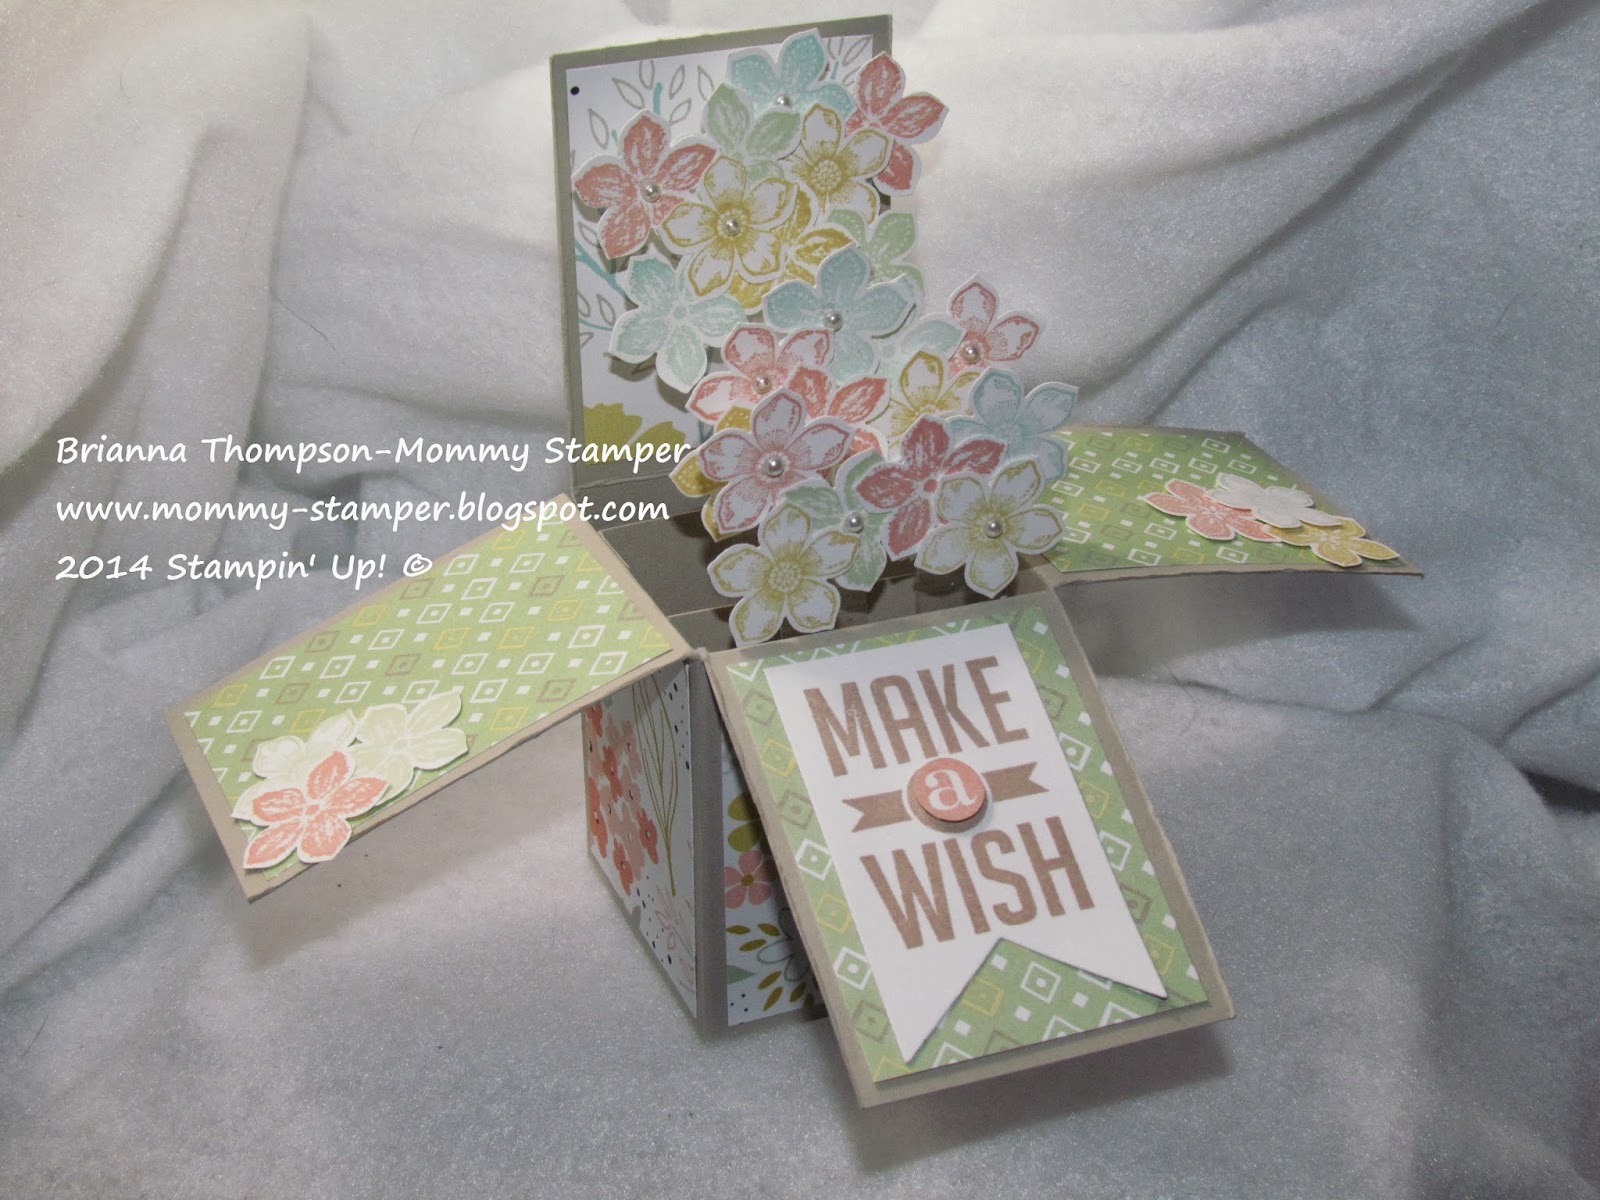
This box is done with the 2014 SAB Designer Series Paper, Perfect Pennants and Petite Petals
This one was done with Papillion Potpourri, Happy Watercolor, Simply Sketched and our gorgeous Watercolor Wonder DSP

Thank you for the different sizing. I also appreciate that I don't need to buy 12 x 12 cardstock to make these. So fun. I love the 'zoo babies' :)
ReplyDelete~Michelle
You're very welcome, enjoy!
DeleteAwesome project! THANKS.
ReplyDeleteThank you Judy, enjoy!
DeleteYour projects are GORGEOUS and so inspiring; thank you so much for sharing! I am so excited to see dimensions and instructions too; a gal on S.C. referred to you on her own creation and mentioned how your projects will fit into our standard-sized envelopes. I am sooo excited by that point, in addition to having your instructions. Thank you for everything! Again, your work is amazing!!!! I enjoyed your lovely presentation also on your video inviting others to join your team; well done and inspiring! Stay well and Happy Crafting!!! Warmly, Donna (SC)
ReplyDeleteThank you so very much Donna!
DeleteThis comment has been removed by the author.
ReplyDeleteWow! I couldn't see the video at first but this is awesome. I am going to have to try it.
ReplyDeleteIt's a lot of fun Tara, you should definitely give it a try!
DeleteThanks for sharing some printed instructions. I enjoy the videos...but they aren't the same as having the instructions right beside you as you create in a tiny space that's hardly big enough to hold the paper cutter, let alone alllll the other things we need to make the project "just right." :) Keep doin' whatcha do. YOU are good at it!
ReplyDeleteThank you so very much! Enjoy!
Deletenice projects
ReplyDeletegreat tutorial i can see
thanks
Ayudya Putri
Thank you Ayudya!
DeleteThanks so much for your tutorial Brianna! I followed your instructions for my project today on our Sunday Stamps blog challenge!
ReplyDeleteWonderful!! So glad you enjoyed it!
DeleteIt’s truly a nice and helpful piece of information. I am glad that you simply shared this useful info with us. Please stay us informed like this. Thanks for sharing.
ReplyDeletediscountboxprinting.com
The post which you have posted is really informative a great thanks to the content writer for providing such a wonderful post.
ReplyDeletecheap box printing
Very nice post, thanks for sharing the information. Keep up the good work.
ReplyDeletecustom boxes
This is so cool!! Heading to the craft room right now :) The video is perfect, clear and simple tutorial. Thanks so much for sharing!
ReplyDeletehow can i add a three layer cake in the middle?
ReplyDeleteThanks For Sharing. Beautiful Cards With Gift Boxes. I Like it. Keep it up. My Custom Boxes
ReplyDelete